Contour
Contouring Perfectly Based on Features and Face Shape
In this section, I’ll talk about how to achieve a particular look with each feature, rather than talking about the best contouring for each face shape. This is because I think what looks best on each person is totally subjective.
Not everyone who has a rounder face necessarily wants to contour it to look more oval – in fact, they might want to emphasize the roundness of their cheeks with their contouring technique! Go feature by feature and figure out how you would like to utilize contouring to change your face.

Contouring the Cheeks
I suspect 90% of people who contour only bother to do it to bring out their cheekbones. This contour technique instantly slims the face and adds a bit of sophistication to a look.
The best place to begin your contour is right by the center of the ear, where the tragus is. You can go a little bit higher if you think the lower part of your face is too short and you want to lengthen it, but I wouldn’t go any lower.
From that outer part of the face you can bring the contour out to below the apples of the cheek or a little bit before them.
To round out your cheekbones a little bit, you can actually bring the contour up a little at the end, so it’ll hug your cheek and emphasize its roundness – this is a great choice for those who feel like their cheekbones are not very prominent or who feel like they don’t really have an “apple” to their cheeks.
If you already have prominent cheekbones you can skip the contouring. If you’re opting for a more “masculine” look, instead of bringing that contour up at the end to round out the cheek bones, do the opposite – bring it down in a straight line. This will create the illusion of a very masculine face shape.
Contouring the Forehead
There are two main ways to contour the forehead. One way, which makes the forehead appear shorter, is by darkening its perimeter, particularly along the hairline.
The second way is by only contouring the sides of the forehead, and highlighting the center. This contouring technique is great if you want to elongate your face. If you already have a narrow forehead (very common for people with diamond shaped faces), you want to skip contouring your forehead altogether.
Contouring the Nose
The simplest way of contouring the nose is by darkening the edges of the bridge of the nose. The closer you draw the two lines together, the slimmer your nose will look.
This method alone is starting to become a little dated, so unless you’re going to use a very light contour shade and to blend it a lot, I recommend avoiding it.
What people are starting to do is either draw a small line of contour just above the upturned part of the nose (about parallel with where the curve of the nostrils starts), or even drawing a circle of contour around that part of the nose. This gives the illusion of a more upturned or button nose.
For a more pinched nose, have your nose contour end in a V at the upturned part, either with or without that extra line of contour above it.
Contouring the Jawline
I’m not a huge fan of the jawline contour in real life, but I gotta admit it is completely sickening in photos. You can really play around with carving out your jawline however you like.
If you want to make your jawline look slimmer and more rounded, apply the contour in a rounded shape from just behind the ear, a little up over the jawbone, and down again below the chin.
If you’re just going for a bit of definition and dimension, don’t go over the jawbone, instead keeping your contour right below it.
Contouring Below the Chin
This is an old contouring technique for anyone who wants to camouflage loose skin under the chin. While this technique works in photos, it rarely hits the mark in real life, so blend well. Simply apply the contour right below the chin to carve out that shape.
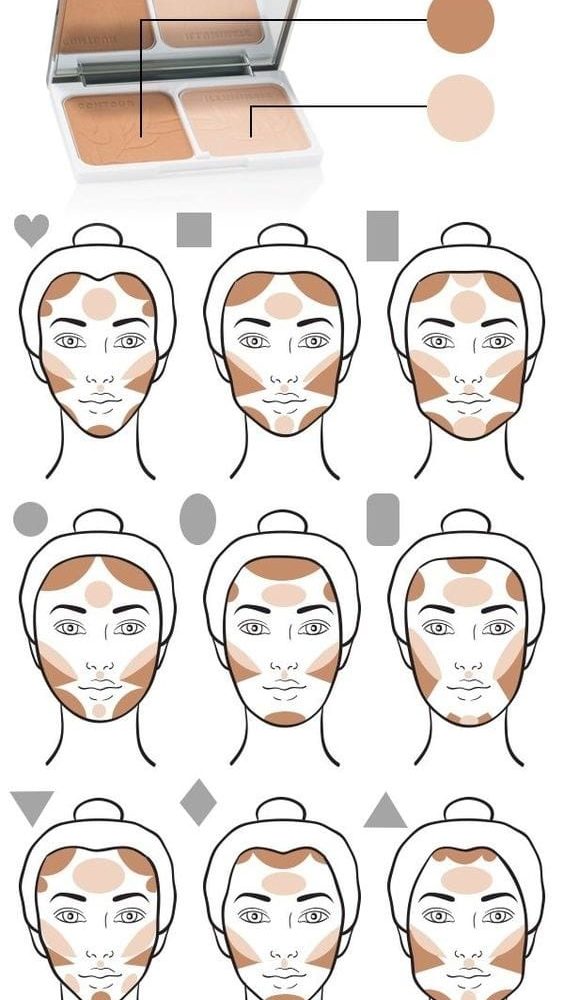
Contouring by Face Shape
• Diamond Face Shape: Start contouring below the cheekbones toward the chin, keeping the middle of the forehead, the center of the chin and the under-eye area for highlighting.
• Heart Face Shape: You want to contour the sides of your forehead near the hairline, the tip of your chin, below the cheekbones, while keeping highlighting for the middle of the forehead, the center of the chin and under the eyes.
• Oblong Face Shape: Contouring makeup should be applied to the area below the cheekbones, underneath the chin and the hairline. Brighten up your look by highlighting the under-eye area.
• Oval Face Shape: Those with oval faces should contour the sides of the forehead and below the cheekbones. Apply highlighter in the middle of the forehead and under the eyes.
• Round Face Shape: Use contouring makeup on the sides of the forehead, along the jawline and below the cheekbones, while highlighting the center of the chin, the middle of the forehead and the under-eye area.
• Square Face Shape: Contour the sides of your forehead, below the jawbone, and below the cheekbones. Highlighter should be applied to the middle of the forehead, the center of the chin and under the eyes.
Recent Comments