
Contour
How to Contour Like a Pro
In this guideline, I’ll outline the steps for a full contouring routine that involves both cream contour and powder contour. Feel free to only opt for one or the other, depending on the kind of makeup look you want. Contouring with both a cream and a powder can look super sculpted, but it’s certainly too heavy for some people.

• Prepare your skin for the perfect makeup look by cleansing, moisturizing, and if necessary, applying a primer.
• Next apply a cream or liquid concealer to the areas where you will need extra coverage, like under the eyes and around the nostrils.
• If you are opting for a softer cream contour, apply your liquid or cream foundation next. If you’re going for a stronger contour, save foundation for later on in your routine.
• Apply any cream highlights you might want to use along the bridge of the nose, top of the cheekbone, center of the forehead, center of the chin, and above the lips.
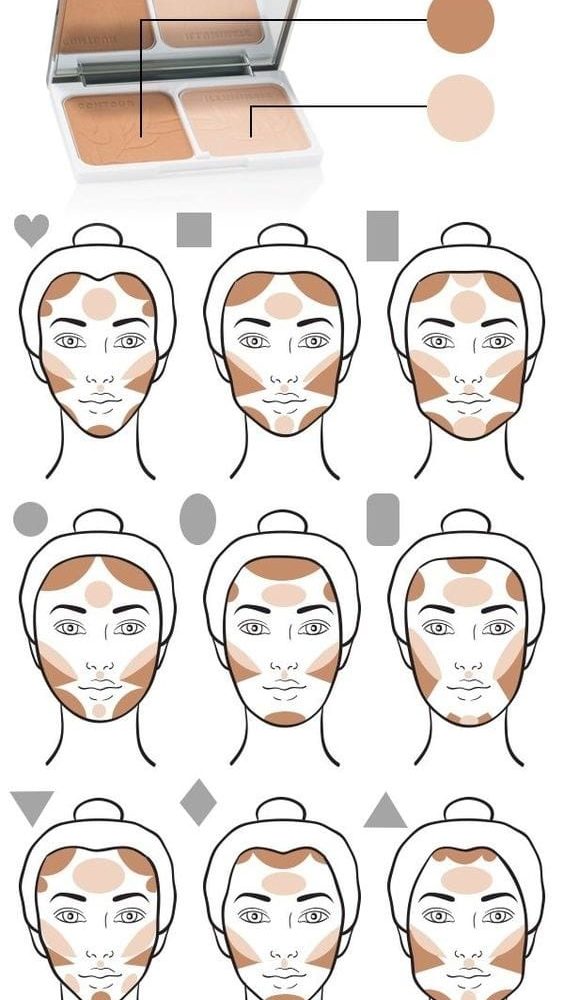
• Now it’s time for the real deal: actually contouring with a cream contour product. Using either the pointy edge of a damp makeup blender, a small foundation or concealer brush, or if you’re using a contour stick then just the stick itself, apply the cream contour to your face.
• To define the cheeks, begin applying the contour on the outer part of the face, near the center of the ear, and pull the cream contour down in a rounded line, so it ends in a thinner point. You can play with different kinds of contour shapes and levels of roundedness to achieve different effects.
• To define the nose, apply a thin line of contour on each side of the bridge of the nose. The closer together the two lines of contour start, the more “snatched” your nose will seem.
• As a base for eyeshadow you can also contour your eye area. Apply your contour cream where you intend to put your darker eyeshadow. Traditionally this would be along the outer V of the eye and above the crease, but if you’re going for a smokey eye, apply it all over the lid.
• To shade the forehead, you can apply the contour more messily just along the sides of the forehead, or all the way along the hairline.
• Now it’s time to blend your contour! Blend sharper contours like the nose and cheekbones by gently tapping over them with a damp beauty blender. You will get a more natural look if your beauty blender has a bit of leftover foundation on it. You can be a bit more aggressive in blending the contour on the forehead, which should be looking more diffused.
• Now that your contour is flawless, double check your foundation and see if you need anymore coverage anywhere.
• With everything flawless you’re ready to set your makeup. For a more natural look, set everything with a translucent face powder and either finish the deal, or layer powder contour on top. For a more intense look, set your highlight with a powder highlighter, and set your contour with a contour powder.
• You can use all kinds of brushes to apply your contour powder – each person finds their favorites that work for them. Choose a smaller blush brush, fan brush, or angled contour brush for contouring larger areas of the face like the cheekbones, forehead, and below the jawline. As with a cream contour, begin by applying your powder contour closer to the outer part of the face, and pull the powder inwards.
• For small parts of the face like the nose and eye area, use a small blending brush (better for a more diffused look) or an eyeshadow brush (for a more defined look). Apply your nose contour slowly, by drawing two lines along bridge of your nose.
• For a more natural look, blend out your larger contour with a slightly larger blush brush or a translucent powder brush.
• For the smaller contours or for a generally stronger contour, use a smaller blending brush, and carefully blend out the edges of your contour.
• Once you’re happy with the results, finish off your makeup with blush, powder highlighter, mascara, eyeshadow, eyebrow filler, and some lipstick or gloss. Voila!
Recent Comments